Labels

Thursday 25 June 2015

Memory-mapped IO vs Port-mapped IO

Microprocessors normally use two methods to connect external devices: memory mapped or port mapped I/O. However, as far as the peripheral is concerned, both methods are really identical.
Memory mapped I/O is mapped into the same address space as program memory and/or user memory, and is accessed in the same way.
Port mapped I/O uses a separate, dedicated address space and is accessed via a dedicated set of microprocessor instructions.
The difference between the two schemes occurs within the microprocessor. Intel has, for the most part, used the port mapped scheme for their microprocessors and Motorola has used the memory mapped scheme.
As 16-bit processors have become obsolete and replaced with 32-bit and 64-bit in general use, reserving ranges of memory address space for I/O is less of a problem, as the memory address space of the processor is usually much larger than the required space for all memory and I/O devices in a system.
Therefore, it has become more frequently practical to take advantage of the benefits of memory-mapped I/O. However, even with address space being no longer a major concern, neither I/O mapping method is universally superior to the other, and there will be cases where using port-mapped I/O is still preferable.

Memory-mapped IO (MMIO)

Memory_mapped_io.png


I/O devices are mapped into the system memory map along with RAM and ROM. To access a hardware device, simply read or write to those 'special' addresses using the normal memory access instructions.
The advantage to this method is that every instruction which can access memory can be used to manipulate an I/O device.
The disadvantage to this method is that the entire address bus must be fully decoded for every device. For example, a machine with a 32-bit address bus would require logic gates to resolve the state of all 32 address lines to properly decode the specific address of any device. This increases the cost of adding hardware to the machine.

Port-mapped IO (PMIO or Isolated IO)

Port_Mapped_io.png
I/O devices are mapped into a separate address space. This is usually accomplished by having a different set of signal lines to indicate a memory access versus a port access. The address lines are usually shared between the two address spaces, but less of them are used for accessing ports. An example of this is the standard PC which uses 16 bits of port address space, but 32 bits of memory address space.
The advantage to this system is that less logic is needed to decode a discrete address and therefore less cost to add hardware devices to a machine. On the older PC compatible machines, only 10 bits of address space were decoded for I/O ports and so there were only 1024 unique port locations; modern PC's decode all 16 address lines. To read or write from a hardware device, special port I/O instructions are used.
From a software perspective, this is a slight disadvantage because more instructions are required to accomplish the same task. For instance, if we wanted to test one bit on a memory mapped port, there is a single instruction to test a bit in memory, but for ports we must read the data into a register, then test the bit.

what is DIfference between I2C and SPI?

Today, at the low end of the communication protocols, we find I²C (for ‘Inter-Integrated Circuit’, protocol) and SPI (for ‘Serial Peripheral Interface’). Both protocols are well-suited for communications between integrated circuits, for slow communication with on-board peripherals. At the roots of these two popular protocols we find two major companies – Philips for I²C and Motorola for SPI – and two different histories about why, when and how the protocols were created.
The I²C bus was developed in 1982; its original purpose was to provide an easy way to connect a CPU to peripherals chips in a TV 
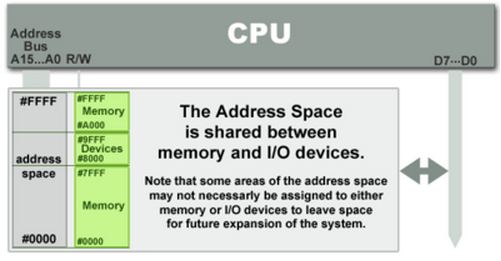
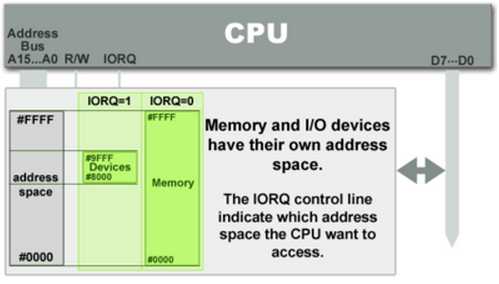
set. Peripheral devices in embedded systems are often connected to the microcontroller as memory-mapped I/O devices. One common way to do this is connecting the peripherals to the microcontroller parallel address and data busses. This results in lots of wiring on the PCB (printed circuit board) and additional ‘glue logic’ to decode the address bus on which all the peripherals are connected. In order to spare microcontroller pins, additional logic and make the PCBs simpler – in order words, to lower the costs – Philips labs in Eindhoven (The Netherlands) invented the ‘Inter-Integrated Circuit’, IIC or I²C protocol that only requires 2 wires for connecting all the peripheral to a microcontroller. The original specification defined a bus speed of 100 kbps (kilo bits per second). The specification was reviewed several times, notably introducing the 400 kbps speed in 1995 and – since 1998, 3.4 Mbps for even faster peripherals.
It seems the Serial Peripheral Protocol (SPI) was first introduced with the first microcontroller deriving from the same architecture as the popular Motorola 68000 microprocessor, announced in 1979. SPI defined the external microcontroller bus, used to connect the microcontroller peripherals with 4 wires. Unlike I²C, it is hard to find a formal separate ‘specification’ of the SPI bus – for a detailed ‘official’ description, one has to read the microcontrollers data sheets and associated application notes.

SPI

SPI is quite straightforward – it defines features any digital electronic engineer would think of if it were to quickly define a way to communicate between 2 digital devices. SPI is a protocol on 4 signal lines (please refer to figure 1):
– A clock signal named SCLK, sent from the bus master to all slaves; all the SPI signals are synchronous to this clock signal;
– A slave select signal for each slave, SSn, used to select the slave the master communicates with;
– A data line from the master to the slaves, named MOSI (Master Out-Slave In)
– A data line from the slaves to the master, named MISO (Master In-Slave Out).
SPI bus topologies
SPI is a single-master communication protocol. This means that one central device initiates all the communications with the slaves. When the SPI master wishes to send data to a slave and/or request information from it, it selects slave by pulling the corresponding SS line low and it activates the clock signal at a clock frequency usable by the master and the slave. The master generates information onto MOSI line while it samples the MISO line (refer to figure 2).
SPI protocol overview
Four communication modes are available (MODE 0, 1, 2, 3) – that basically define the SCLK edge on which the MOSI line toggles, the SCLK edge on which the master samples the MISO line and the SCLK signal steady level (that is the clock level, high or low, when the clock is not active). Each mode is formally defined with a pair of parameters called ‘clock polarity’ (CPOL) and ‘clock phase’ (CPHA).
SPI modes
A master/slave pair must use the same set of parameters – SCLK frequency, CPOL, and CPHA for a communication to be possible. If multiple slaves are used, that are fixed in different configurations, the master will have to reconfigure itself each time it needs to communicate with a different slave.

This is basically all what is defined for the SPI protocol. SPI does not define any maximum data rate, not any particular addressing scheme; it does not have a acknowledgement mechanism to confirm receipt of data and does not offer any flow control. Actually, the SPI master has no knowledge of whether a slave exists, unless ‘something’ additional is done outside the SPI protocol. For example a simple codec won’t need more than SPI, while a command-response type of control would need a higher-level protocol built on top of the SPI interface. SPI does not care about the physical interface characteristics like the I/O voltages and standard used between the devices. Initially, most SPI implementation used a non-continuous clock and byte-by-byte scheme. But many variants of the protocol now exist, that use a continuous clock signal and an arbitrary transfer length.
  
I²C
I²C is a multi-master protocol that uses 2 signal lines. The two I²C signals are called ‘serial data’ (SDA) and ‘serial clock’ (SCL). There is no need of chip select (slave select) or arbitration logic. Virtually any number of slaves and any number of masters can be connected onto these 2 signal lines and communicate between each other using a protocol that defines:
– 7-bits slave addresses: each device connected to the bus has got such a unique address;
– data divided into 8-bit bytes
– a few control bits for controlling the communication start, end, direction and for an acknowledgment mechanism.
The data rate has to be chosen between 100 kbps, 400 kbps and 3.4 Mbps, respectively called standard mode, fast mode and high speed mode. Some I²C variants include 10 kbps (low speed mode) and 1 Mbps (fast mode +) as valid speeds.
Physically, the I²C bus consists of the 2 active wires SDA and SCL and a ground connection (refer to figure 4). The active wires are both bi-directional. The I2C protocol specification states that the IC that initiates a data transfer on the bus is considered the Bus Master. Consequently, at that time, all the other ICs are regarded to be Bus Slaves.
I2C bus topology
First, the master will issue a START condition. This acts as an ‘Attention’ signal to all of the connected devices. All ICs on the bus will listen to the bus for incoming data.
Then the master sends the ADDRESS of the device it wants to access, along with an indication whether the access is a Read or Write operation (Write in our example). Having received the address, all IC’s will compare it with their own address. If it doesn’t match, they simply wait until the bus is released by the stop condition (see below). If the address matches, however, the chip will produce a response called the ACKNOWLEDGE signal.
Once the master receives the acknowledge, it can start transmitting or receiving DATA. In our case, the master will transmit data. When all is done, the master will issue the STOP condition. This is a signal that states the bus has been released and that the connected ICs may expect another transmission to start any moment.
When a master wants to receive data from a slave, it proceeds the same way, but sets the RD/nWR bit at a logical one. Once the slave has acknowledged the address, it starts sending the requested data, byte by byte. After each data byte, it is up to the master to acknowledge the received data (refer to figure 5).
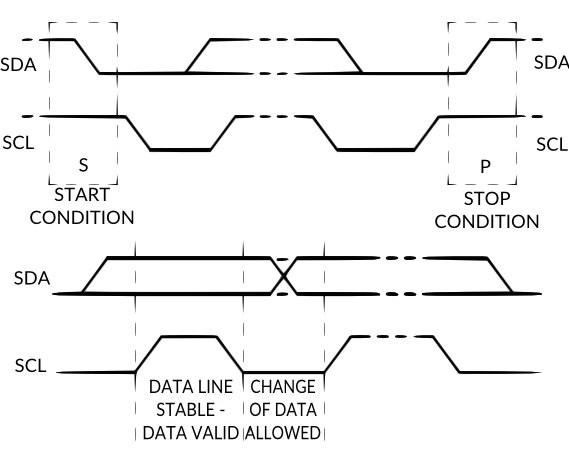
Details on I2C protocol
START and STOP are unique conditions on the bus that are closely dependent of the I²C bus physical structure. Moreover, the I²C specification states that data may only change on the SDA line if the SCL clock signal is at low level; conversely, the data on the SDA line is considered as stable when SCL is in high state (refer to figure 6 hereafter).
Details (2) on I2C protocol
At the physical layer, both SCL and SDA lines are open-drain I/Os with pull-up resistors (refer to figure 4). Pulling such a line to ground is decoded as a logical zero, while releasing the line and letting it flow is a logical one. Actually, a device on a I²C bus ‘only drives zeros’.
Here we come to where I²C is truly elegant. Associating the physical layer and the protocol described above allow flawless communication between any number of devices, on just 2 physical wires.
For example, what happens if 2 devices are simultaneously trying to put information on the SDA and / or SCL lines?
At electrical level, there is actually no conflict at all if multiple devices try to put any logic level on the I²C bus lines simultaneously. If one of the drivers tries to write a logical zero and the other a logical one, then the open-drain and pull-up structure ensures that there will be no shortcut and the bus will actually see a logical zero transiting on the bus. In other words, in any conflict, a logic zero always ‘wins’.
The bus physical implementation also allows the master devices to simultaneously write and listen to the bus lines. This way, any device is able to detect collisions. In case of a conflict between two masters (one of them trying to write a zero and the other one a one), the master that gains the arbitration on the bus will even not be aware there has been a conflict: only the master that looses will know – since it intends to write a logic one and reads a logic zero. As a result, a master that looses arbitration on a I²C will stop trying to access the bus. In most cases, it will just delay its access and try the same access later.
Moreover, the I²C protocol also helps at dealing with communication problems. Any device present on the I²C listens to it permanently. Potential masters on the I²C detecting a START condition will wait until a STOP is detected to attempt a new bus access. Slaves on the I²C bus will decode the device address that follows the START condition and check if it matches theirs. All the slaves that are not addressed will wait until a STOP condition is issued before listening again to the bus. Similarly, since the I²C protocol foresees active-low acknowledge bit after each byte, the master / slave couple is able to detect their counterpart presence. Ultimately, if anything else goes wrong, this would mean that the device ‘talking on the bus’ (master or slave) would know it by simply comparing what it sends with what is seen on the bus. If a difference is detected, a STOP condition must be issued, which releases the bus.
Additionally, I²C has got some advanced features, like extended bus addressing, clock stretching and the very specific 3.4 Mbps high speed mode.
– 10-bits device addressing
Any I²C device must have a built-in 7 bits address. In theory, this means that there would be only 128 different I²C devices types in the world. Practically, there are much more different I²C devices and it is a high probability that 2 devices have the same address on a I²C bus. To overcome this limitation, devices often have multiple built-in addresses that the engineer can chose by though external configuration pins on the device. The I²C specification also foresees a 10-bits addressing scheme in order to extend the range of available devices address.
Practically, this has got the following impact on the I²C protocol (refer to figure 7):
– Two address words are used for device addressing instead of one.
– The first address word MSBs are conventionally coded as “11110” so any device on the bus is aware the master sends a 10 bits device address.
I2C 10 bits addressing
Actually, there are other reserved address codes for specific types of accesses (refer to table 1). For details about them, please refer to the I²C specification.
I2C reserved addresses
– Clock stretching
In an I²C communication the master device determines the clock speed. The SCL signal is an explicit clock signal on which the communication synchronizes.
However, there are situations where an I²C slave is not able to co-operate with the clock speed given by the master and needs to slow down a little. This is done by a mechanism referred to as clock stretching and is made possible by the particular open-drain / pull-up structure of a I²C bus line.
An I²C slave is allowed to hold down the clock if it needs to reduce the bus speed. The master on the other hand is required to read back the clock signal after releasing it to high state and wait until the line has actually gone high.
– High speed mode
Fundamentally, the use of pull-ups to set a logic one limits the maximum speed of the bus. This may be a limiting factor for many applications. This is why the 3.4 Mbps high speed mode was introduced. Prior to using this mode, the bus master must issue a specific ‘High Speed Master’ code at a lower speed mode (for example: 400 kbps Fast Mode) (refer to Table 1), which initiates a session at 3.4 Mbps. Specific I/O buffers must also be used to let the bus to shorten the signals rise time and increase the bus speed. The protocol is also somewhat adapted in such a way that no arbitration is performed during the high speed transfer. Refer to the I²C specification for more information about the high speed mode.

Friday 19 June 2015

what is ADTS?

Audio Data Transport Stream (ADTS) is a format, used by MPEG TS or Shoutcast to stream audio, usually AAC.

Structure

AAAAAAAA AAAABCCD EEFFFFGH HHIJKLMM MMMMMMMM MMMOOOOO OOOOOOPP (QQQQQQQQ QQQQQQQQ)
Header consists of 7 or 9 bytes (without or with CRC).
Letter Length (bits) Description
A 12 syncword 0xFFF, all bits must be 1
B 1 MPEG Version: 0 for MPEG-4, 1 for MPEG-2
C 2 Layer: always 0
D 1 protection absent, Warning, set to 1 if there is no CRC and 0 if there is CRC
E 2 profile, the MPEG-4 Audio Object Type minus 1
F 4 MPEG-4 Sampling Frequency Index (15 is forbidden)
G 1 private bit, guaranteed never to be used by MPEG, set to 0 when encoding, ignore when decoding
H 3 MPEG-4 Channel Configuration (in the case of 0, the channel configuration is sent via an inband PCE)
I 1 originality, set to 0 when encoding, ignore when decoding
J 1 home, set to 0 when encoding, ignore when decoding
K 1 copyrighted id bit, the next bit of a centrally registered copyright identifier, set to 0 when encoding, ignore when decoding
L 1 copyright id start, signals that this frame's copyright id bit is the first bit of the copyright id, set to 0 when encoding, ignore when decoding
M 13 frame length, this value must include 7 or 9 bytes of header length: FrameLength = (ProtectionAbsent == 1 ? 7 : 9) + size(AACFrame)
O 11 Buffer fullness
P 2 Number of AAC frames (RDBs) in ADTS frame minus 1, for maximum compatibility always use 1 AAC frame per ADTS frame
Q 16 CRC if protection absent is 0

Usage in MPEG-TS

ADTS packet must be a content of PES packet. Pack AAC data inside ADTS frame, than pack inside PES packet, then mux by TS packetizer.

Usage in Shoutcast

ADTS frames goes one by one in TCP stream. Look for syncword, parse header and look for next syncword after.

aac header formats

In AAC raw format means it contains only the data. no header portions. Sampling Rate, channels and object type have to be specified by us via application.

ADIF: ADIF_HEADER FRAME1 FRAME2 FRAME3....

In ADIF the header is given only at the beginning. The rest is the frame data. If the header portion is lost we cannot decode it.
ADIF header has a 32 bit ADIF code, 0x41444946 at the start of the header, which helps the decoder to know that it is a ADIF encoded stream. All the data required to decode the stream such as sampling rate, channels, profile etc are all given inside the header

ADTS : ADTS_HEADER FRAME1 ADTS_HEADER FRAME2 ADTS_HEADER FRAME3...

In ADTS, each frame data is preceded by a header. So even if the header portion of any frame is lost, we can still decode the stream. It is very helpful in streaming applications. ADTS header begins with a 12 bit header sync 0xFFF, which helps the decoder to know that it is an ADTS encoded stream.
ADTS header has a fixed and variable header. Fixed header consists of general stream information like sampling rate, channels, profile etc. which remains the same in every frame. Variable header has frame related information like encoded frame size, which varies with frames.

Thursday 4 June 2015

RTSP flow between a server and client.

RTSP call-flow

A typical RTSP streaming session, where the RTP payload is streamed over UDP, uses a workflow described in the following client-to-server and server-to-client message exchanges:

OPTIONS:

  • The client initiates the session with the server by sending an OPTIONS request. The server replies to this request with information about what it supports and what kind of requests it can receive from the client.

Client-to-Server: Request
OPTIONS rtsp://184.72.239.149/vod/mp4:sample.mp4 RTSP/1.0
CSeq: 2
User-Agent: LibVLC/2.0.5 (LIVE555 Streaming Media v2012.09.13)
 Server-to-Client: Response
RTSP/1.0 200 OK
Supported: play.basic, con.persistent
CSeq: 2
Server: Wowza Streaming Engine 4.1.0 build12602
Public: DESCRIBE, SETUP, TEARDOWN, PLAY, PAUSE, OPTIONS, ANNOUNCE, RECORD, GET_PARAMETER
Cache-Control: no-cache

DESCRIBE:

  • The client sends a DESCRIBE message and the server responds with an SDP file that the client can use to get more information about the content that will be sent by the server. The SDP file contains information about the video/audio codecs used, clip duration, trackIDs, profile level, and so on. In the following example, the audio track is trackID=1 and the video track is trackID=2.
Client-to-Server
DESCRIBE rtsp://184.72.239.149/vod/mp4:sample.mp4 RTSP/1.0
CSeq: 3
User-Agent: LibVLC/2.0.5 (LIVE555 Streaming Media v2012.09.13)
Accept: application/sdp
 Server-to-Client
RTSP/1.0 200 OK
Content-Base: rtsp://184.72.239.149/vod/mp4:sample.mp4/
Date: Tue, 23 Apr 2013 14:19:15 UTC
Content-Length: 576
Session: 408754851;timeout=60
Expires: Tue, 23 Apr 2013 14:19:15 UTC
CSeq: 3
Content-Type: application/sdp
Server: Wowza Streaming Engine 4.1.0 build12602
Cache-Control: no-cache
v=0
o=- 408754851 408754851 IN IP4 127.0.0.1
s=sample.mp4
c=IN IP4 0.0.0.0
t=0 0
a=sdplang:en
a=range:npt=0- 596.458
a=control:*
m=audio 0 RTP/AVP 96
a=rtpmap:96 mpeg4-generic/48000/2
a=fmtp:96 profile-level-id=1;mode=AAC-hbr;sizelength=13;indexlength=3;indexdeltalength=3;config=1190
a=control:trackID=1
m=video 0 RTP/AVP 97
a=rtpmap:97 H264/90000
a=fmtp:97 packetization-mode=1;profile-level-id=42C01E;sprop-parameter-sets=Z0LAHtkDxWhAAAADAEAAAAwDxYuS,aMuMsg==
a=cliprect:0,0,160,240
a=framesize:97 240-160
a=framerate:24.0
a=control:trackID=2


SETUP:

  • The client sends two SETUP requests to the server, one for the video track and one for the audio track. The track IDs are received during the previous DESCRIBE message response. During the SETUP message exchange, the clinet informs the server about which UDP ports it will use for the RTP and RTCP communication for both video and audio tracks. The server will respond with an acknowledgement of the client ports to be used for the RTP/RTCP communication and inform the client about the UDP server ports that will be used for this session.

In the following example, the client will use the following ports:

Audio

  • The server will send RTP packets from UDP source port 7066 to the client UDP destination port 57780
  • The server will send RTCP sender reports from UDP source port 7067 to the client UDP destination port 57781
  • The client will send receiver reports from UDP source port 57781 to the server UDP destination port 7067
Video
  • The server will send RTP packets from UDP source port 7064 to the client UDP destination port 57782
  • The server will send RTCP sender reports from UDP source port 7065 to the client UDP destination port 57783
  • The client will send receiver reports from UDP source port 57783 to the server UDP destination port 7065
Client-to-Server: SETUP request for audio track
SETUP rtsp://184.72.239.149/vod/mp4:sample.mp4/trackID=1 RTSP/1.0
CSeq: 4
User-Agent: LibVLC/2.0.5 (LIVE555 Streaming Media v2012.09.13)
Transport: RTP/AVP;unicast;client_port=57780-57781
 Server-to-Client
RTSP/1.0 200 OK
Date: Tue, 23 Apr 2013 14:19:15 UTC
Transport: RTP/AVP;unicast;client_port=57780-57781;source=184.72.239.149;server_port=7066-7067;ssrc=07938AE3
Session: 408754851;timeout=60
Expires: Tue, 23 Apr 2013 14:19:15 UTC
CSeq: 4
Server: Wowza Streaming Engine 4.1.0 build12602
Cache-Control: no-cache
 Client-to-Server: SETUP request for video track
SETUP rtsp://184.72.239.149/vod/mp4:sample.mp4/trackID=2 RTSP/1.0
CSeq: 5
User-Agent: LibVLC/2.0.5 (LIVE555 Streaming Media v2012.09.13)
Transport: RTP/AVP;unicast;client_port=57782-57783
Session: 408754851
Server-to-Client
RTSP/1.0 200 OK
Date: Tue, 23 Apr 2013 14:19:15 UTC
Transport: RTP/AVP;unicast;client_port=57782-57783;source=184.72.239.149;server_port=7064-7065;ssrc=1206BD1C
Session: 408754851;timeout=60
Expires: Tue, 23 Apr 2013 14:19:15 UTC
CSeq: 5
Server: Wowza Streaming Engine 4.1.0 build12602
Cache-Control: no-cache

PLAY:

  • After the communication ports are established, the client will send a PLAY request that informs the server that it's ready to receive the RTP data flow. After acknowledging the request, the server starts sending the RTP payload and the periodic sender reports. The server will also receive the receiver reports from the client. Since the RTP data stream is flowing from the server to the client, the receiver reports from the client are the only feedback received by the server about the status of the communication, and confirms that the client is receiving the RTP packets. 
  • If no receiver reports come from the client, it means that there's no client to receive the RTP packets and the RTP stream can be stopped.

    During RTSP troubleshooting, you can use the Wireshark packet analyzer to follow the entire communication between the server and a particular client, having information about the ports used for the RTP/RTCP communication and filtering only the source and destination IP addresses.

    The RTP packets should arrive client-side in the correct sequence. You can analyze the server sender reports to see which packet was last sent by the server and compare with the received packets client-side.

    If a Wireshark trace is taken server-side, you can check to see if receiver reports are present in the trace and get information about the latest packets received by the client. You can also get additional information about the packet loss rate, latest packet sequence received by the client, and so on. 

Client-to-Server

PLAY rtsp://184.72.239.149/vod/mp4:sample.mp4/ RTSP/1.0
CSeq: 6
User-Agent: LibVLC/2.0.5 (LIVE555 Streaming Media v2012.09.13)
Session: 408754851
Range: npt=0.000-
Server-to-Client
RTSP/1.0 200 OK
Range: npt=0.0-596.458
Session: 408754851;timeout=60
CSeq: 6
RTP-Info: url=rtsp://184.72.239.149/vod/mp4:sample.mp4/trackID=1;seq=1;rtptime=0,url=rtsp://184.72.239.149/vod/mp4:sample.mp4/trackID=2;seq=1;rtptime=0
Server: Wowza Streaming Engine 4.1.0 build12602
Cache-Control: no-cache

TEARDOWN:

  • When the user presses the Stop button, or closes the player, a TEARDOWN request is sent to the server to inform it that playback has stopped. The server will then stop sending RTP data to the client and stop the streaming session. 
Client-to-Server

TEARDOWN rtsp://184.72.239.149/vod/mp4:sample.mp4/ RTSP/1.0
CSeq: 7
User-Agent: LibVLC/2.0.5 (LIVE555 Streaming Media v2012.09.13)
Session: 408754851


Wednesday 3 June 2015

MP3 file format..


This is a brief and informal document targeted to those who want to deal with the MPEG format. If you are one of them, you probably already know what is MPEG audio. If not, jump to http://www.mp3.com/ or http://www.layer3.org/ where you will find more details and also more links. This document does not cover compression and decompression algorithm.
NOTE: You cannot just search the Internet and find the MPEG audio specs. It is copyrighted and you will have to pay quite a bit to get the Paper. That's why I made this. Information I got is gathered from the Internet, and mostly originate from program sources I found available for free. Despite my intention to always specify the information sources, I am not able to do it this time. Sorry, I did not maintain the list. :-(
These are not a decoding specs, it just informs you how to read the MPEG headers and the MPEG TAG. MPEG Version 1, 2 and 2.5 and Layer I, II and III are supported, the MP3 TAG (ID3v1 and ID3v1.1) also.. Those of you who use Delphi may find MPGTools Delphi unit (freeware source) useful, it is where I implemented this stuff.
I do not claim information presented in this document is accurate. At first I just gathered it from different sources. It was not an easy task but I needed it. Later, I received lots of comments as feedback when I published this document. I think this last release is highly accurate due to comments and corrections I received.
This document is last updated on December 22, 1999.
MPEG Audio Compression Basics
This is one of many methods to compress audio in digital form trying to consume as little space as possible but keep audio quality as good as possible. MPEG compression showed up as one of the best achievements in this area.
This is a lossy compression, which means, you will certainly loose some audio information when you use this compression methods. But, this lost can hardly be noticed because the compression method tries to control it. By using several quite complicate and demanding mathematical algorithms it will only loose those parts of sound that are hard to be heard even in the original form. This leaves more space for information that is important. This way you can compress audio up to 12 times (you may choose compression ratio) which is really significant. Due to its quality MPEG audio became very popular.
MPEG standards MPEG-1, MPEG-2 and MPEG-4 are known but this document covers first two of them. There is an unofficial MPEG-2.5 which is rarely used. It is also covered.
MPEG-1 audio (described in ISO/IEC 11172-3) describes three Layers of audio coding with the following properties:

  • one or two audio channels
  • highest possible bitrate goes up to about 1Mbps for 5.1
    MPEG Audio Frame Header
    An MPEG audio file is built up from smaller parts called frames. Generally, frames are independent items. Each frame has its own header and audio informations. There is no file header. Therefore, you can cut any part of MPEG file and play it correctly (this should be done on frame boundaries but most applications will handle incorrect headers). For Layer III, this is not 100% correct. Due to internal data organization in MPEG version 1 Layer III files, frames are often dependent of each other and they cannot be cut off just like that.
    When you want to read info about an MPEG file, it is usually enough to find the first frame, read its header and assume that the other frames are the same This may not be always the case. Variable bitrate MPEG files may use so called bitrate switching, which means that bitrate changes according to the content of each frame. This way lower bitrates may be used in frames where it will not reduce sound quality. This allows making better compression while keeping high quality of sound.
    The frame header is constituted by the very first four bytes (32bits) in a frame. The first eleven bits (or first twelve bits, see below about frame sync) of a frame header are always set and they are called "frame sync". Therefore, you can search through the file for the first occurence of frame sync (meaning that you have to find a byte with a value of 255, and followed by a byte with its three (or four) most significant bits set). Then you read the whole header and check if the values are correct. You will see in the following table the exact meaning of each bit in the header, and which values may be checked for validity. Each value that is specified as reserved, invalid, bad, or not allowed should indicate an invalid header. Remember, this is not enough, frame sync can be easily (and very frequently) found in any binary file. Also it is likely that MPEG file contains garbage on it's beginning which also may contain false sync. Thus, you have to check two or more frames in a row to assure you are really dealing with MPEG audio file.
    Frames may have a CRC check. The CRC is 16 bits long and, if it exists, it follows the frame header. After the CRC comes the audio data. You may calculate the length of the frame and use it if you need to read other headers too or just want to calculate the CRC of the frame, to compare it with the one you read from the file. This is actually a very good method to check the MPEG header validity.
    Here is "graphical" presentation of the header content. Characters from A to M are used to indicate different fields. In the table, you can see details about the content of each field.
    AAAAAAAA AAABBCCD EEEEFFGH IIJJKLMM
    SignLength
    (bits)
    Position
    (bits)
    Description
    A11(31-21)Frame sync (all bits set)
    B2(20,19)MPEG Audio version ID
    00 - MPEG Version 2.5
    01 - reserved
    10 - MPEG Version 2 (ISO/IEC 13818-3)
    11 - MPEG Version 1 (ISO/IEC 11172-3) Note: MPEG Version 2.5 is not official standard. Bit No 20 in frame header is used to indicate version 2.5. Applications that do not support this MPEG version expect this bit always to be set, meaning that frame sync (A) is twelve bits long, not eleve as stated here. Accordingly, B is one bit long (represents only bit No 19). I recommend using methodology presented here, since this allows you to distinguish all three versions and keep full compatibility.
    C2(18,17) Layer description
    00 - reserved
    01 - Layer III
    10 - Layer II
    11 - Layer I
    D1(16) Protection bit
    0 - Protected by CRC (16bit crc follows header)
    1 - Not protected
    E4(15,12)Bitrate index
    bitsV1,L1V1,L2V1,L3V2,L1V2, L2 & L3
    0000freefreefreefreefree
    0001323232328
    00106448404816
    00119656485624
    010012864566432
    010116080648040
    011019296809648
    01112241129611256
    100025612811212864
    100128816012814480
    101032019216016096
    1011352224192176112
    1100384256224192128
    1101416320256224144
    1110448384320256160
    1111badbadbadbadbad
    NOTES: All values are in kbps
    V1 - MPEG Version 1
    V2 - MPEG Version 2 and Version 2.5
    L1 - Layer I
    L2 - Layer II
    L3 - Layer III
    "free" means free format. If the correct fixed bitrate (such files cannot use variable bitrate) is different than those presented in upper table it must be determined by the application. This may be implemented only for internal purposes since third party applications have no means to find out correct bitrate. Howewer, this is not impossible to do but demands lot's of efforts.
    "bad" means that this is not an allowed value
    MPEG files may have variable bitrate (VBR). This means that bitrate in the file may change. I have learned about two used methods:

  • bitrate switching. Each frame may be created with different bitrate. It may be used in all layers. Layer III decoders must support this method. Layer I & II decoders may support it.
  • bit reservoir. Bitrate may be borrowed (within limits) from previous frames in order to provide more bits to demanding parts of the input signal. This causes, however, that the frames are no longer independent, which means you should not cut this files. This is supported only in Layer III. More about VBR you may find on Xing Tech site
    For Layer II there are some combinations of bitrate and mode which are not allowed. Here is a list of allowed combinations.
    bitrate allowed modes
    free all
    32 single channel
    48 single channel
    56 single channel
    64 all
    80 single channel
    96 all
    112 all
    128 all
    160 all
    192 all
    224 stereo, intensity stereo, dual channel
    256 stereo, intensity stereo, dual channel
    320 stereo, intensity stereo, dual channel
    384 stereo, intensity stereo, dual channel
  • F2(11,10) Sampling rate frequency index (values are in Hz)
    bitsMPEG1MPEG2MPEG2.5
    00441002205011025
    01480002400012000
    1032000160008000
    11reserv.reserv.reserv.
    G1(9) Padding bit
    0 - frame is not padded
    1 - frame is padded with one extra slot
    Padding is used to fit the bit rates exactly. For an example: 128k 44.1kHz layer II uses a lot of 418 bytes and some of 417 bytes long frames to get the exact 128k bitrate. For Layer I slot is 32 bits long, for Layer II and Layer III slot is 8 bits long. How to calculate frame length
    First, let's distinguish two terms frame size and frame length. Frame size is the number of samples contained in a frame. It is constant and always 384 samples for Layer I and 1152 samples for Layer II and Layer III. Frame length is length of a frame when compressed. It is calculated in slots. One slot is 4 bytes long for Layer I, and one byte long for Layer II and Layer III. When you are reading MPEG file you must calculate this to be able to find each consecutive frame. Remember, frame length may change from frame to frame due to padding or bitrate switching.
    Read the BitRate, SampleRate and Padding of the frame header.
    For Layer I files us this formula:
    FrameLengthInBytes = (12 * BitRate / SampleRate + Padding) * 4
    For Layer II & III files use this formula:
    FrameLengthInBytes = 144 * BitRate / SampleRate + Padding
    Example:
    Layer III, BitRate=128000, SampleRate=441000, Padding=0
          ==>  FrameSize=417 bytes
    H1(8) Private bit. It may be freely used for specific needs of an application, i.e. if it has to trigger some application specific events.
    I2(7,6) Channel Mode
    00 - Stereo
    01 - Joint stereo (Stereo)
    10 - Dual channel (Stereo)
    11 - Single channel (Mono)
    J2(5,4) Mode extension (Only if Joint stereo) Mode extension is used to join informations that are of no use for stereo effect, thus reducing needed resources. These bits are dynamically determined by an encoder in Joint stereo mode.
    Complete frequency range of MPEG file is divided in subbands There are 32 subbands. For Layer I & II these two bits determine frequency range (bands) where intensity stereo is applied. For Layer III these two bits determine which type of joint stereo is used (intensity stereo or m/s stereo). Frequency range is determined within decompression algorythm.
    Layer I and IILayer III
    valueLayer I & II
    00bands 4 to 31
    01bands 8 to 31
    10bands 12 to 31
    11bands 16 to 31
    Intensity stereoMS stereo
    offoff
    onoff
    offon
    onon
    K1(3) Copyright
    0 - Audio is not copyrighted
    1 - Audio is copyrighted
    L1(2) Original
    0 - Copy of original media
    1 - Original media
    M2(1,0) Emphasis
    00 - none
    01 - 50/15 ms
    10 - reserved
    11 - CCIT J.17
    MPEG Audio Tag ID3v1
    The TAG is used to describe the MPEG Audio file. It contains information about artist, title, album, publishing year and genre. There is some extra space for comments. It is exactly 128 bytes long and is located at very end of the audio data. You can get it by reading the last 128 bytes of the MPEG audio file.
    AAABBBBB BBBBBBBB BBBBBBBB BBBBBBBB
    BCCCCCCC CCCCCCCC CCCCCCCC CCCCCCCD
    DDDDDDDD DDDDDDDD DDDDDDDD DDDDDEEE
    EFFFFFFF FFFFFFFF FFFFFFFF FFFFFFFG
    SignLength
    (bytes)
    Position
    (bytes)
    Description
    A3(0-2) Tag identification. Must contain 'TAG' if tag exists and is correct.
    B30(3-32)Title
    C30(33-62)Artist
    D30(63-92)Album
    E4(93-96)Year
    F30(97-126)Comment
    G1(127)Genre
    The specification asks for all fields to be padded with null character (ASCII 0). However, not all applications respect this (an example is WinAmp which pads fields with <space>, ASCII 32).
    There is a small change proposed in ID3v1.1 structure. The last byte of the Comment field may be used to specify the track number of a song in an album. It should contain a null character (ASCII 0) if the information is unknown.

  • sample rate 32kHz, 44.1kHz or 48kHz.
  • bit rates from 32kbps up to 448kbps
    Each layer has its merits. MPEG-2 audio (described in ISO/IEC 13818-3) has two extensions to MPEG-1, usually referred as MPEG-2/LSF and MPEG-2/Multichannel.
    MPEG-2/LSF has the following properties:
  • one or two audio channels
  • sample rates half those of MPEG-1
  • bit rates from 8 kbps up to 256kbps. MPEG-2/Multichannel has the following properties:
  • up to 5 full range audio channels and an LFE-channel (Low Frequency Enhancement <> subwoofer!)
  • sample rates the same as those of MPEG-1